‘Hugo的Stack主题美化零碎’
自动添加摘要与副标题
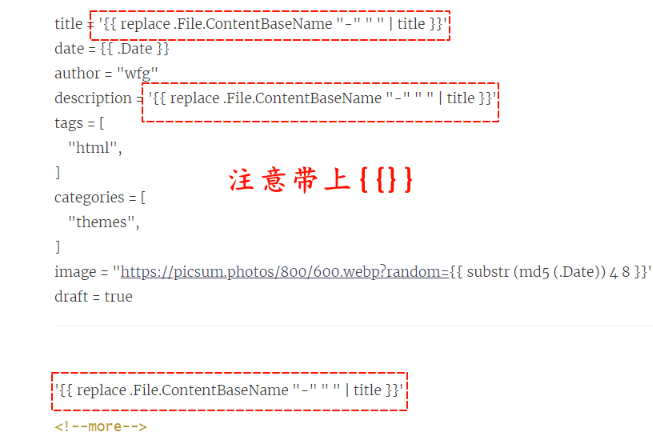
原理: 与创建博客时的名字一样.摘要与副标题
1
hugo new content post/hugo博客总结/index.md
如何更改:
位置: dev\archetypes\default.md
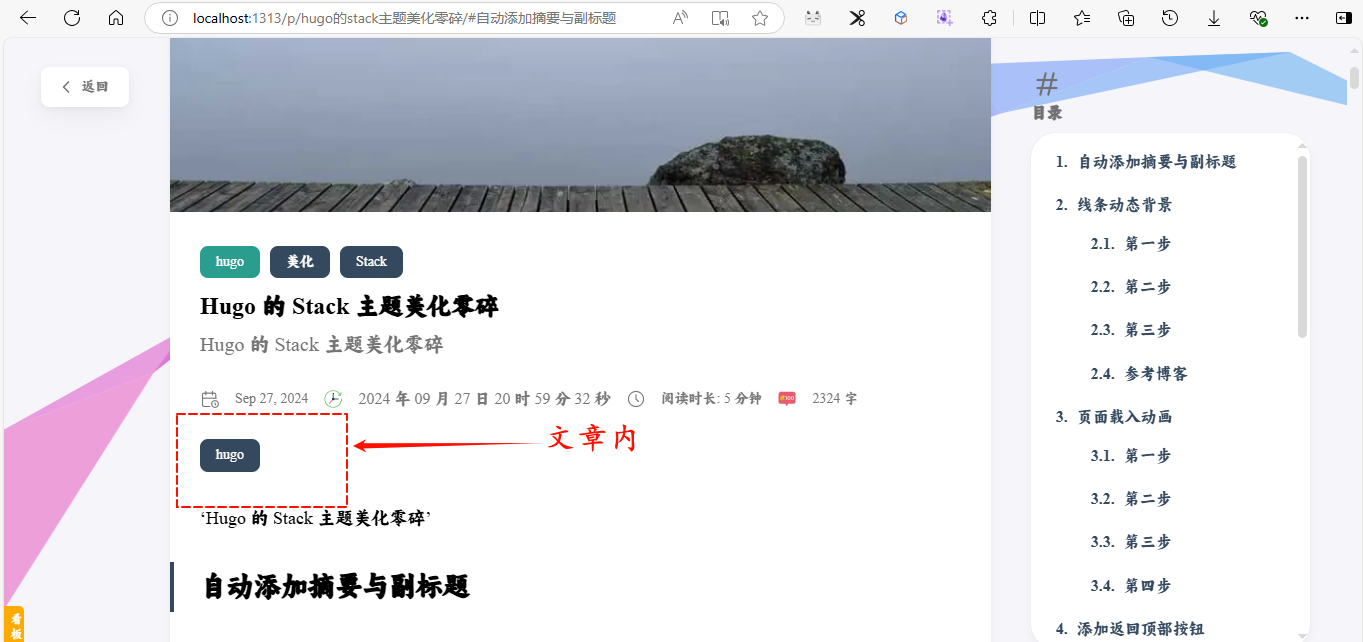
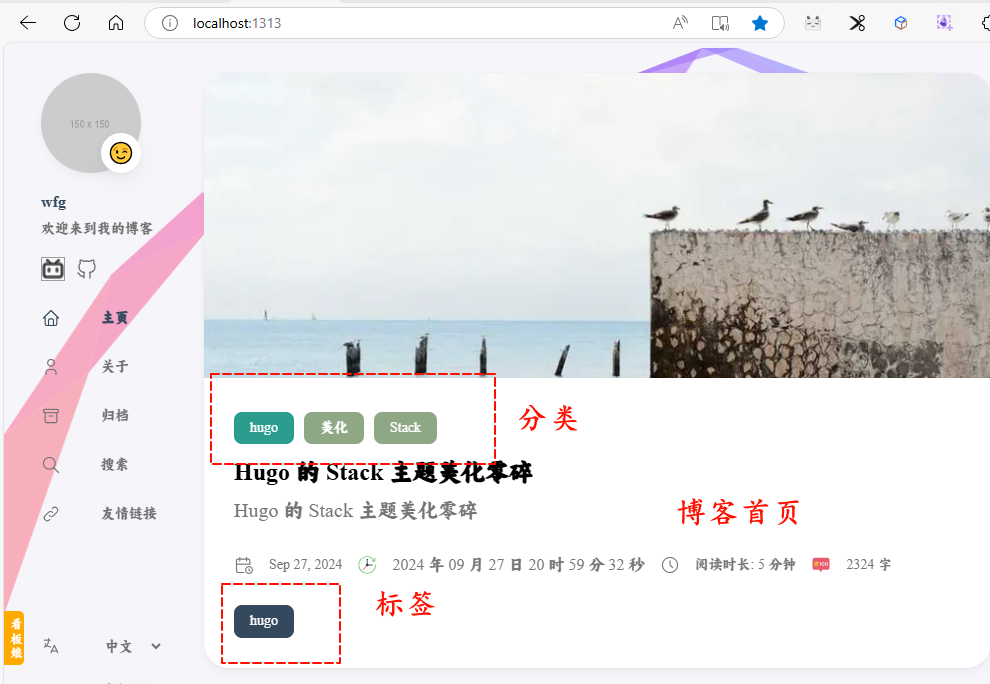
将标签添加主页导航与文章内上部
示例图片
点击后可以跳转对应的
代码
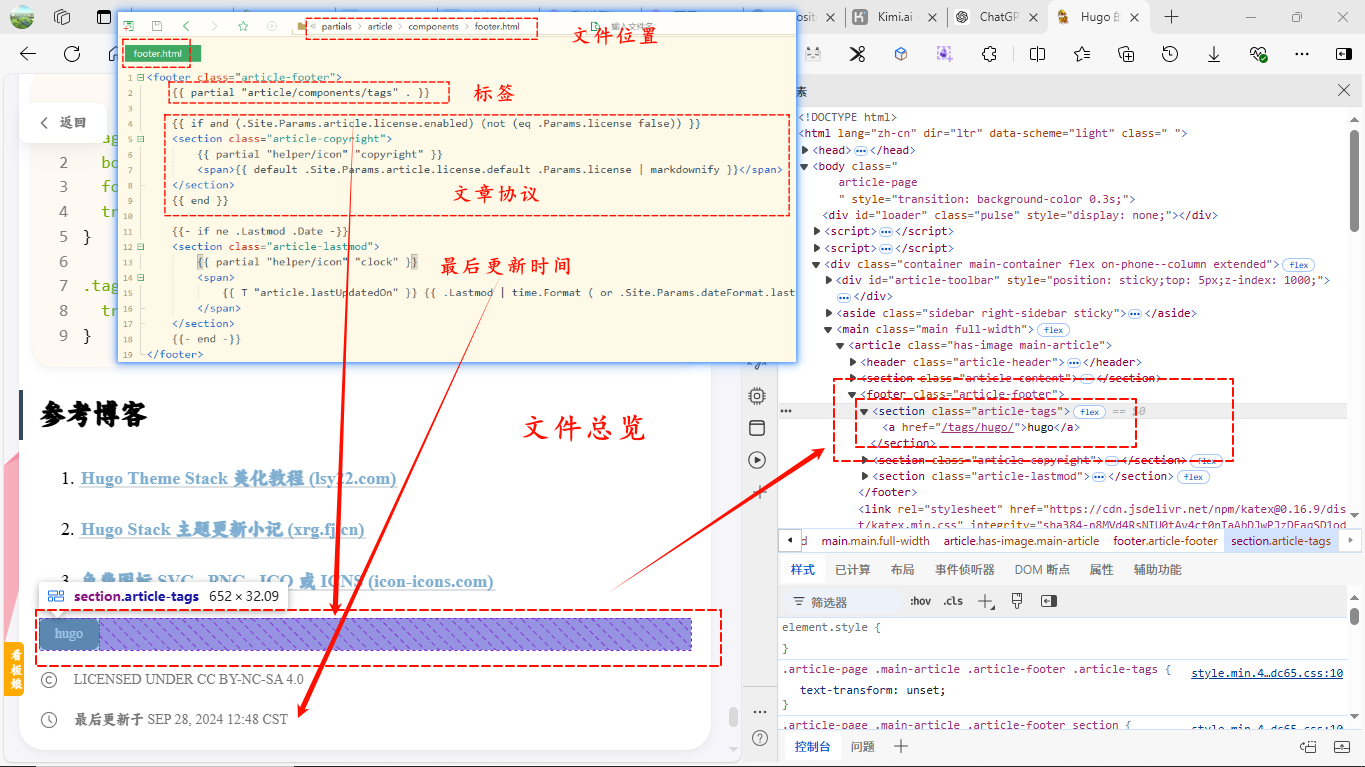
位置: layouts\partials\article\components\details.html(没有从themes对应的位置复制)
最底部, <div>标签内
1
{{ partial "article/components/tags" . }}
参考
是因为先找到了文章内部自带的标签,在最底部,找到了它的位置 themes/layouts/partials/article/components/footer.html(最后更新时间,文章协议),然后将对应位置内容复制到标题头所在位置: layouts\partials\article\components\details.html(标题,分类,创建时间所在的等)
成功了
文章内部,F12找到对应的 内容
线条动态背景
失败,不搞了
第一步
下载动态背景
github:
动态线条-驱散
通过 demo 在浏览器中打开,看看效果
第二步
位置: dev\layouts\_default\baseof.html
最外层
1
2
3
< div id = "particles-js" ></ div >
< script src = "https://1510882710.github.io/js/particles.js" async = "" ></ script >
< script src = "https://1510882710.github.io/js/app.js" async = "" ></ script >
将下载的动态背景里的particles.js和app.js放到**public/js**内
位置: particles.js-2.0.0\particles.js和particles.js-2.0.0\demo\js\app.js
第三步
位置:
1
2
3
4
5
6
. particles-js-canvas-el {
position : fixed ;
top : 0 ;
left : 0 ;
width : 100 %
}
参考博客
博客搭建指南——2 (xrg.fj.cn)
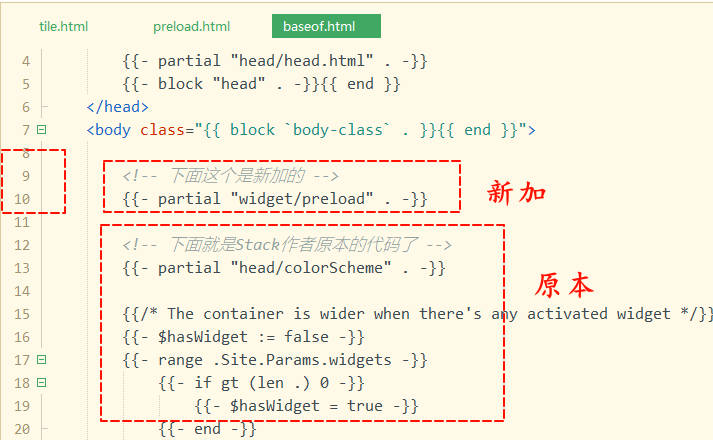
页面载入动画
删除if后成功了
第一步
位置: layouts/partials/widget/preload.html(自己创建)
 1
 2
 3
 4
 5
 6
 7
 8
 9
10
11
12
13
14
15
16
17
18
19
20
21
22
< div id = "loading-box" >
<!-- 页面加载完成之后帷幕拉开的效果 -->
< div class = "loading-left-bg" ></ div >
< div class = "loading-right-bg" ></ div >
<!-- 旋转盒子动效 -->
< div class = "spinner-box" >
< div class = "configure-border-1" >
< div class = "configure-core" ></ div >
</ div >
< div class = "configure-border-2" >
< div class = "configure-core" ></ div >
</ div >
< div class = "loading-word" > 加载中...</ div >
</ div >
</ div >
<!-- 页面加载动画 -->
< script >
$ ( document ). ready ( function () {
document . getElementById ( 'loading-box' ). classList . add ( "loaded" )
})
</ script >
第二步
位置: layouts/_default/baseof.html (从theme主题复制)
1
2
3
<!-- 下面这个是新加的 -->
    {{- partial "widget/preload" . -}}
    <!-- 下面就是Stack作者原本的代码了 -->
第三步
位置:assets/scss/custom.scss
最底部添加
  1
  2
  3
  4
  5
  6
  7
  8
  9
 10
 11
 12
 13
 14
 15
 16
 17
 18
 19
 20
 21
 22
 23
 24
 25
 26
 27
 28
 29
 30
 31
 32
 33
 34
 35
 36
 37
 38
 39
 40
 41
 42
 43
 44
 45
 46
 47
 48
 49
 50
 51
 52
 53
 54
 55
 56
 57
 58
 59
 60
 61
 62
 63
 64
 65
 66
 67
 68
 69
 70
 71
 72
 73
 74
 75
 76
 77
 78
 79
 80
 81
 82
 83
 84
 85
 86
 87
 88
 89
 90
 91
 92
 93
 94
 95
 96
 97
 98
 99
100
101
102
103
104
105
106
107
108
109
110
111
112
113
114
#loading-box .loading-left-bg,
#loading-box .loading-right-bg {
    position: fixed;
    z-index: 1000;
    width: 50%;
    height: 100%;
    // 我在这里小改了一下颜色,
    background-color: #b1c0c7;
    transition: all 0.5s;
}

#loading-box .loading-right-bg {
    right: 0;
}

#loading-box>.spinner-box {
    position: fixed;
    z-index: 1001;
    display: flex;
    justify-content: center;
    align-items: center;
    width: 100%;
    height: 100vh;
}

#loading-box .spinner-box .configure-border-1 {
    position: absolute;
    padding: 3px;
    width: 115px;
    height: 115px;
    background: #ffab91;
    animation: configure-clockwise 3s ease-in-out 0s infinite alternate;
}

#loading-box .spinner-box .configure-border-2 {
    left: -115px;
    padding: 3px;
    width: 115px;
    height: 115px;
    background: rgb(63, 249, 220);
    transform: rotate(45deg);
    animation: configure-xclockwise 3s ease-in-out 0s infinite alternate;
}

#loading-box .spinner-box .loading-word {
    position: absolute;
    color: #ffffff;
    // 我在这里小改了一下文字大小和字体,注意!
    font-size: 1.8rem;
    font-family: 'Zhi Mang Xing', cursive;
}

#loading-box .spinner-box .configure-core {
    width: 100%;
    height: 100%;
    background-color: #37474f;
}

div.loaded div.loading-left-bg {
    transform: translate(-100%, 0);
}

div.loaded div.loading-right-bg {
    transform: translate(100%, 0);
}

div.loaded div.spinner-box {
    // 你可以把这个注释掉,这样就能一直看那个动画的效果了!
    display: none !important;
}

@keyframes configure-clockwise {
    0% {
        transform: rotate(0);
    }

    25% {
        transform: rotate(90deg);
    }

    50% {
        transform: rotate(180deg);
    }

    75% {
        transform: rotate(270deg);
    }

    100% {
        transform: rotate(360deg);
    }
}

@keyframes configure-xclockwise {
    0% {
        transform: rotate(45deg);
    }

    25% {
        transform: rotate(-45deg);
    }

    50% {
        transform: rotate(-135deg);
    }

    75% {
        transform: rotate(-225deg);
    }

    100% {
        transform: rotate(-315deg);
    }
}
第四步
完成上面两步之后,动画暂时还不能生效,因为我们新增组件的时候加了个 if 判断,还记得吗?
在配置文件的相应位置(我这里是 params 栏目底下)加上 enablePreloadingAnim: true 这个键值对,然后就可以享受这个很棒的载入动画了!
添加返回顶部按钮
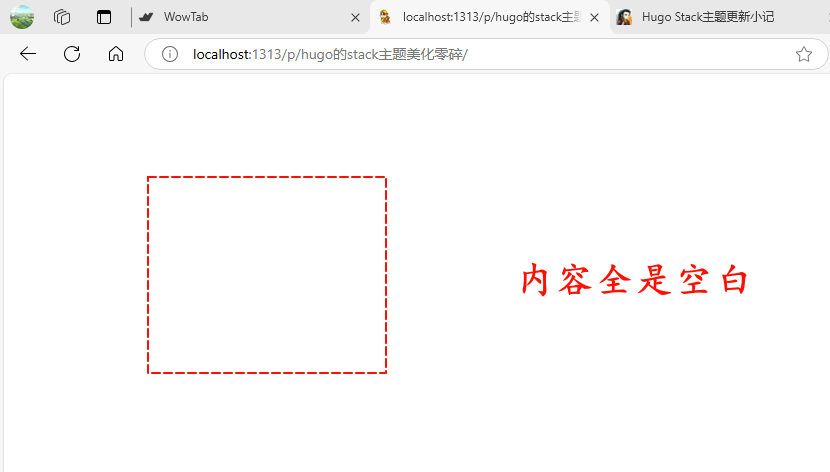
失败了,显示不了,
更改后文章 内容显示不出来,
且返回按钮也消失了
调整后,文章内容能显示了,但 按钮还是显示不了
好像是custom的位置不对吧
第一步
位置:layouts/partials/head/script.html(没有的话从themes主题相同路径复制)
 1
 2
 3
 4
 5
 6
 7
 8
 9
10
11
12
13
14
15
16
17
18
< script src = "https://apps.bdimg.com/libs/jquery/2.1.4/jquery.min.js" ></ script >
< script >
// Check to see if the window is top if not then display button
$ ( window ). scroll ( function () {
if ( $ ( this ). scrollTop ()) {
$ ( '#back-to-top' ). fadeIn ();
} else {
$ ( '#back-to-top' ). fadeOut ();
}
});
// Click event to scroll to top
$ ( '#back-to-top' ). click ( function () {
$ ( 'html, body' ). animate ({ scrollTop : 0 }, 1000 );
return false ;
});
</ script >
第二步
下载图片
位置: dev\assets\img\top.png
注意图片名称
注意图片在下面代码的引用位置
图片来源:
https://icon-icons.com/zh/
第三步
位置:layouts/_default/single.html 在它的第 47 行找到了TOC的代码,在 aside 内部、TOC底部插入下面的代码:
 1
 2
 3
 4
 5
 6
 7
 8
 9
10
11
12
13
14
15
16
17
18
19
20
21
22
{{ define "right-sidebar" }}
{{ if (.Scratch.Get "hasTOC") }}
< aside class = "sidebar right-sidebar sticky" >
< section class = "widget archives" >
< div class = "widget-icon" >
{{ partial "helper/icon" "hash" }}
</ div >
< h2 class = "widget-title section-title" > {{ T "article.tableOfContents" }}</ h2 >
< div class = "widget--toc" >
{{ .TableOfContents }}
</ div >
</ section >
{{ $topImg := resources.Get ("img/top.png") }}
{{ $topImg := $topImg.Resize "40x" }}
< a id = "back-to-top" href = "#" >
< img src = "{{ $topImg.RelPermalink }}" />
</ a >
</ aside >
{{ end }}
{{ end }}
第四步
位置: dev\assets\scss\custom.scss
 1
 2
 3
 4
 5
 6
 7
 8
 9
10
11
12
$hover : 0 .2 s ease-in-out ;
#back-to-top {
bottom : - 30 px ;
right : 2 px ;
display : none ;
position : absolute ;
border : 0 ;
transition : transform $hover ;
& :hover {
transform : translateY ( - 10 px );
}
}
汉语与英语之间自动添加空格
在主题目录中的 layouts/partials/footer/footer.html 中写入以下内容
 1
 2
 3
 4
 5
 6
 7
 8
 9
10
11
< script >
( function ( u , c ) {
var d = document , t = 'script' , o = d . createElement ( t ),
s = d . getElementsByTagName ( t )[ 0 ];
o . src = u ;
if ( c ) { o . addEventListener ( 'load' , function ( e ) { c ( e ); }); }
s . parentNode . insertBefore ( o , s );
})( '//cdn.bootcss.com/pangu/4.0.7/pangu.min.js' , function () {
pangu . spacingPage ();
});
</ script >
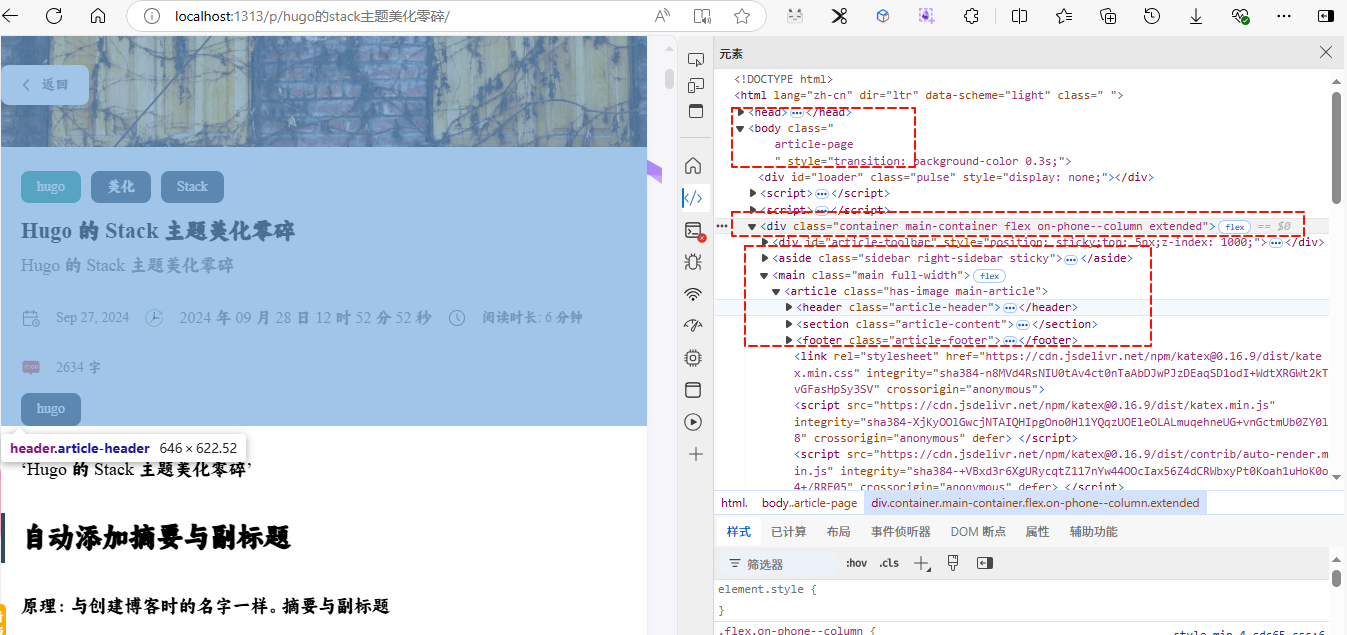
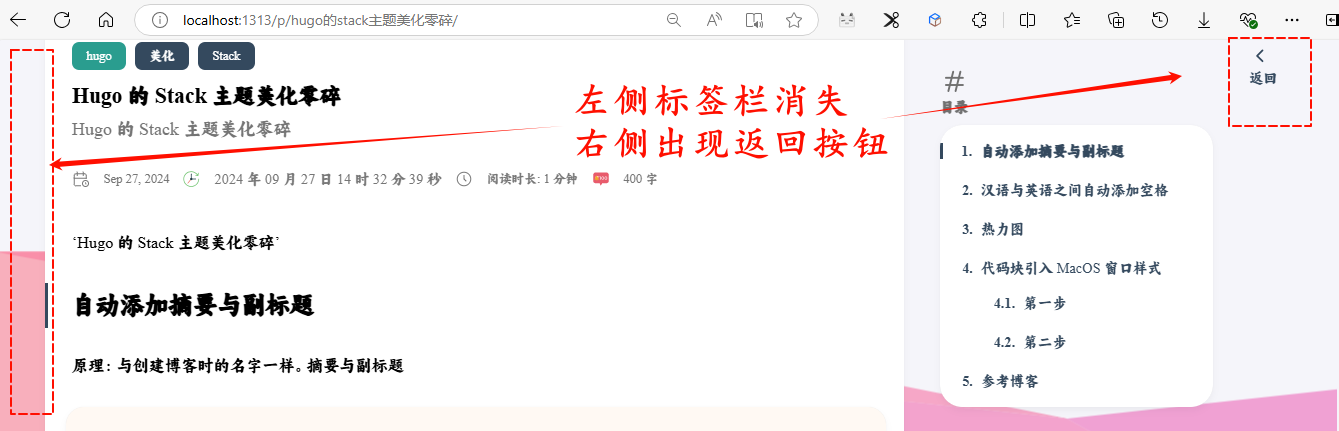
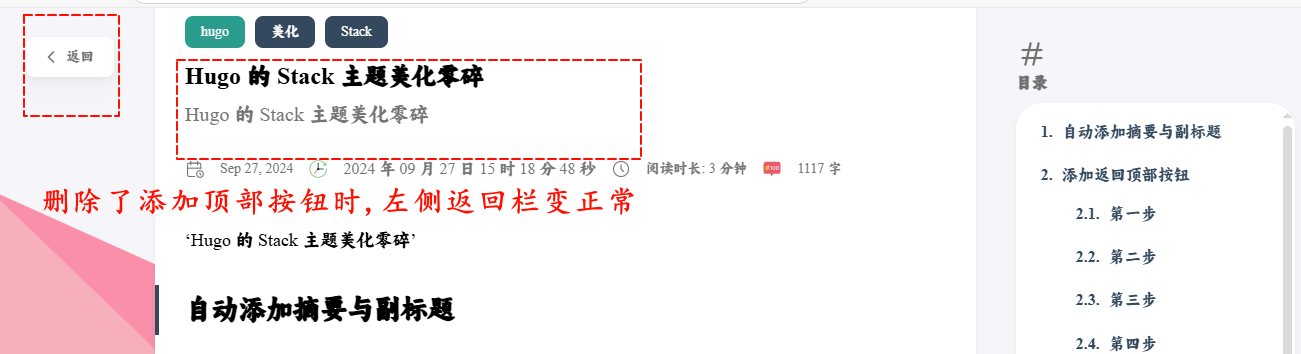
添加返回按钮
修改后图片
第一步
位置: dev\assets\scss\custom.scss
 1
 2
 3
 4
 5
 6
 7
 8
 9
10
11
12
13
14
15
16
17
18
19
20
21
22
23
24
25
26
27
28
29
30
31
32
33
34
35
36
37
38
39
40
41
42
43
44
45
46
47
48
49
50
51
52
53
54
55
//--------------------------------------------------
// 引入左上角返回按钮
. back - home {
background : var ( -- card - background );
border - radius : var ( -- tag - border - radius );
color : var ( -- card - text - color - tertiary );
margin - right : 0.1 rem ;
margin - top : 24 px ;
display : inline - flex ;
align - items : center ;
font - size : 1.4 rem ;
text - transform : uppercase ;
padding : 10 px 20 px 10 px 15 px ;
transition : box - shadow 0.3 s ease ;
box - shadow : var ( -- shadow - l3 );
& : hover {
box - shadow : var ( -- shadow - l2 );
}
svg {
margin - right : 5 px ;
width : 20 px ;
height : 20 px ;
}
span {
font - weight : 500 ;
white - space : nowrap ;
}
}
. main - container . right - sidebar {
order : 2 ;
max - width : var ( -- right - sidebar - max - width );
/// Display right sidebar when min - width : lg
@ include respond ( lg ) {
display : flex ;
}
}
main . main {
order : 1 ;
min - width : 0 ;
max - width : 100 % ;
flex - grow : 1 ;
display : flex ;
flex - direction : column ;
gap : var ( -- section - separation );
@ include respond ( md ) {
padding - top : var ( -- main - top - padding );
}
}
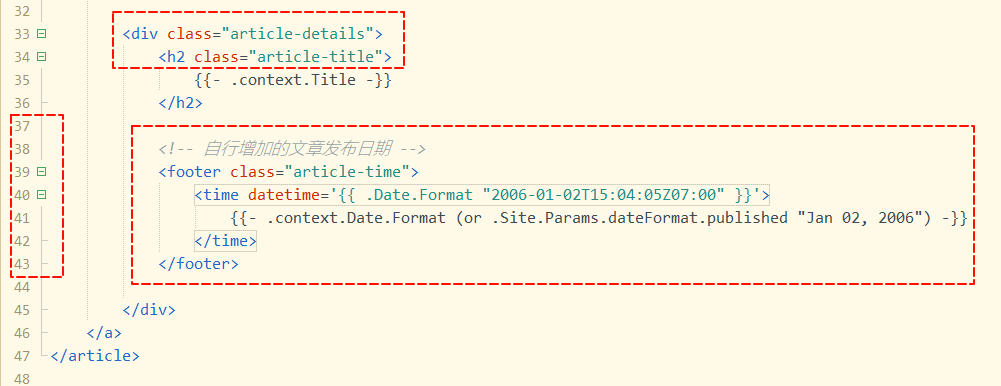
文章底部相关文章添加日期
修改后样例图片
第一步
位置: layouts/partials/article-list/tile.html (没有从themes的相关位置复制)
1
2
3
4
5
6
<!-- 自行增加的文章发布日期 -->
< footer class = "article-time" >
< time datetime = '{{ .Date.Format "2006-01-02T15:04:05Z07:00" }}' >
{{- .context.Date.Format (or .Site.Params.dateFormat.published "Jan 02, 2006") -}}
</ time >
</ footer >
代码第37行左右
热力图
参考博客
Hugo Theme Stack 美化教程 (lsy22.com)
且写入下面内容后 {\{< heatmap >}\},网站上不会显示此标题
代码块引入 MacOS 窗口样式
实话: 修改后不知道成没成功,好像跟之前没什么区别
第一步
位置: dev\assets\img\code-header.svg
没有的话自己创建一个
1
2
3
4
5
<svg xmlns= "http://www.w3.org/2000/svg" version= "1.1" x= "0px" y= "0px" width= "450px" height= "130px" >
<ellipse cx= "65" cy= "65" rx= "50" ry= "52" stroke= "rgb(220,60,54)" stroke-width= "2" fill= "rgb(237,108,96)" />
<ellipse cx= "225" cy= "65" rx= "50" ry= "52" stroke= "rgb(218,151,33)" stroke-width= "2" fill= "rgb(247,193,81)" />
<ellipse cx= "385" cy= "65" rx= "50" ry= "52" stroke= "rgb(27,161,37)" stroke-width= "2" fill= "rgb(100,200,86)" />
</svg>
第二步
位置: dev\assets\scss\custom.scss
 1
 2
 3
 4
 5
 6
 7
 8
 9
10
11
12
13
14
15
//----------------------------------------------------------
//为代码块顶部添加macos样式
.article-content {
.highlight :before {
content : "" ;
display : block ;
background : url(../img/code-header.svg) ;
height : 32 px ;
width : 100 % ;
background-size : 57 px ;
background-repeat : no-repeat ;
margin-bottom : 5 px ;
background-position : - 1 px 2 px ;
}
}
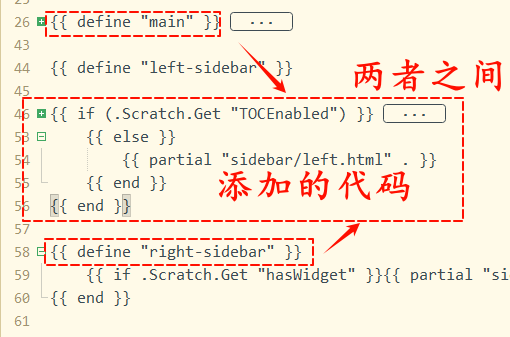
第二步
位置: dev\layouts\_default\single.html
没有的话从themes的文件夹的相同位置复制过来
代码位置: 在 40行左右
 1
 2
 3
 4
 5
 6
 7
 8
 9
10
11
12
13
{{ define "left-sidebar" }}
{{ if (.Scratch.Get "TOCEnabled") }}
< div id = "article-toolbar" style = "position: sticky;top: 5px;z-index: 1000;" >
< a href = "{{ .Site.BaseURL | relLangURL }}" class = "back-home" >
{{ (resources.Get "icons/back.svg").Content | safeHTML }}
< span > {{ T "article.back" }}</ span >
</ a >
</ div >
{{ else }}
{{ partial "sidebar/left.html" . }}
{{ end }}
{{ end }}
文章顶部加载进度条
位置: layouts/partials/footer/custom.html
 1
 2
 3
 4
 5
 6
 7
 8
 9
10
11
12
13
14
15
16
17
18
< script
src = "https://cdn.jsdelivr.net/gh/zhixuan2333/gh-blog@v0.1.0/js/nprogress.min.js"
integrity = "sha384-bHDlAEUFxsRI7JfULv3DTpL2IXbbgn4JHQJibgo5iiXSK6Iu8muwqHANhun74Cqg"
crossorigin = "anonymous"
></ script >
< link
rel = "stylesheet"
href = "https://cdn.jsdelivr.net/gh/zhixuan2333/gh-blog@v0.1.0/css/nprogress.css"
integrity = "sha384-KJyhr2syt5+4M9Pz5dipCvTrtvOmLk/olWVdfhAp858UCa64Ia5GFpTN7+G4BWpE"
crossorigin = "anonymous"
/>
< script >
NProgress .start () ;
document .addEventListener ( "readystatechange" , () => {
if ( document .readyState === "interactive" ) NProgress .inc ( 0 .8 ) ;
if ( document .readyState === "complete" ) NProgress .done () ;
});
</ script >
头像360度旋转
第一步
位置:dev/assets/scss/custom.scss
底部
 1
 2
 3
 4
 5
 6
 7
 8
 9
10
11
12
13
14
15
16
17
18
19
20
21
22
23
24
25
26
// 头像旋转动画 鼠标在上面时

// .sidebar header .site-avatar .site-logo {
//   transition: transform 1.65s ease-in-out; // 旋转时间
// }
// .sidebar header .site-avatar .site-logo:hover {
//   transform: rotate(360deg); // 旋转角度为360度
// }

//--------------------------------------------------

// 头像自动旋转动画  一直自动旋转
@keyframes spin {
  from {
    transform: rotate(0deg);
  }
  to {
    transform: rotate(360deg);
  }
}

.sidebar header .site-avatar .site-logo {
  animation: spin 1s linear infinite; // 每隔1秒旋转360度
}
//--------------------------------------------------
标签动画
效果: 鼠标位于标签上时,标签会放大
位置: layouts/partials/footer/custom.html
底部位置
1
2
3
4
5
6
7
8
9
.tagCloud .tagCloud-tags a {
border-radius : 10 px ;
font-size : 1 .4 rem ;
transition : transform .3 s ease ;
}
.tagCloud .tagCloud-tags a :hover {
transform : scale ( 1 .1 , 1 .1 );
}
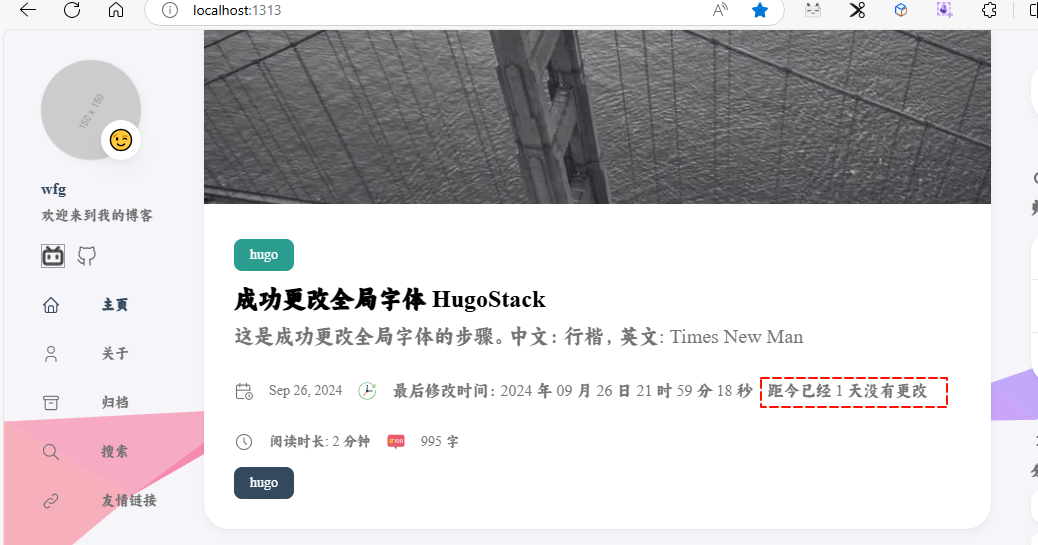
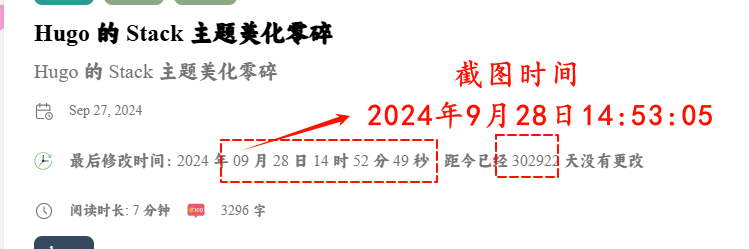
距今多少天没有修改
示例图片
第一步
位置:
 1
 2
 3
 4
 5
 6
 7
 8
 9
10
11
12
13
14
15
16
17
18
19
20
21
22
23
24
25
26
27
28
29
30
31
32
33
34
35
36
37
38
39
40
41
42
43
44
45
46
47
48
49
50
51
52
53
54
55
56
57
58
59
60
61
62
63
64
65
66
67
68
69
70
71
72
73
74
75
76
77
78
79
80
81
82
83
84
85
86
87
88
89
90
91
92
93
< div class = "article-details" >
{{ if .Params.categories }}
< header class = "article-category" >
{{ range (.GetTerms "categories") }}
< a href = "{{ .RelPermalink }}" {{ with . Params . style }} style = "background-color: {{ .background }}; color: {{ .color }};" {{ end }} >
{{ .LinkTitle }}
</ a >
{{ end }}
</ header >
{{ end }}
< div class = "article-title-wrapper" >
< h2 class = "article-title" >
< a href = "{{ .RelPermalink }}" >
{{- .Title -}}
</ a >
</ h2 >
{{ with .Params.description }}
< h3 class = "article-subtitle" >
{{ . }}
</ h3 >
{{ end }}
</ div >
{{ $showReadingTime := .Params.readingTime | default (.Site.Params.article.readingTime) }}
{{ $showDate := not .Date.IsZero }}
{{ $showFooter := or $showDate $showReadingTime }}
{{ if $showFooter }}
< footer class = "article-time" >
{{ if $showDate }}
< div >
{{ partial "helper/icon" "date" }}
< time class = "article-time--published" >
{{- .Date | time.Format (or .Site.Params.dateFormat.published "Jan 02, 2006") -}}
</ time >
</ div >
{{ end }}
{{ if ne (.Lastmod.Format "2006-01-02 15:04:05") (.Date.Format "2006-01-02 15:04:05") }}
< div >
{{ partial "helper/icon" "updateTime" }}
< p > 最后修改时间:{{ .Lastmod.Year }} 年 {{ printf "%02d" .Lastmod.Month }} 月 {{ printf "%02d" .Lastmod.Day }} 日 {{ printf "%02d" .Lastmod.Hour }} 时 {{ printf "%02d" .Lastmod.Minute }} 分 {{ printf "%02d" .Lastmod.Second }} 秒</ p >
<!-- 计算距今已经多少天、小时、分钟、秒没有修改 -->
{{ $lastmod := .Lastmod }}
{{ $now := now }}
{{ $diff := $now.Sub $lastmod }}
{{ $days := div (int $diff.Seconds) 86400 }} <!-- 取整天数 -->
{{ $remainingHours := div (mod (int $diff.Seconds) 86400) 3600 }}
{{ $remainingMinutes := div (mod (int $diff.Seconds) 3600) 60 }}
{{ $remainingSeconds := mod (int $diff.Seconds) 60 }}
< p > 距今已经 {{ $days }} 天 {{ $remainingHours }} 小时 {{ $remainingMinutes }} 分 {{ $remainingSeconds }} 秒没有修改</ p >
</ div >
{{ end }}
{{ if $showReadingTime }}
< div >
{{ partial "helper/icon" "clock" }}
< time class = "article-time--reading" >
{{ T "article.readingTime" .ReadingTime }}
</ time >
</ div >
{{ end }}
{{ if .Site.Params.article.readingTime }}
< div >
{{ partial "helper/icon" "wordAccount" }}
< time class = "article-words" >
{{ .WordCount }} 字
</ time >
</ div >
{{ end }}
</ footer >
{{ end }}
{{ if .IsTranslated }}
< footer class = "article-translations" >
{{ partial "helper/icon" "language" }}
< div >
{{ range .Translations }}
< a href = "{{ .Permalink }}" class = "link" > {{ .Language.LanguageName }}</ a >
{{ end }}
</ div >
</ footer >
{{ end }}
{{ partial "article/components/tags" . }}
</ div >
Bug
当修改时间,不足一天时,会显示错误的未修改天数,,已经解决
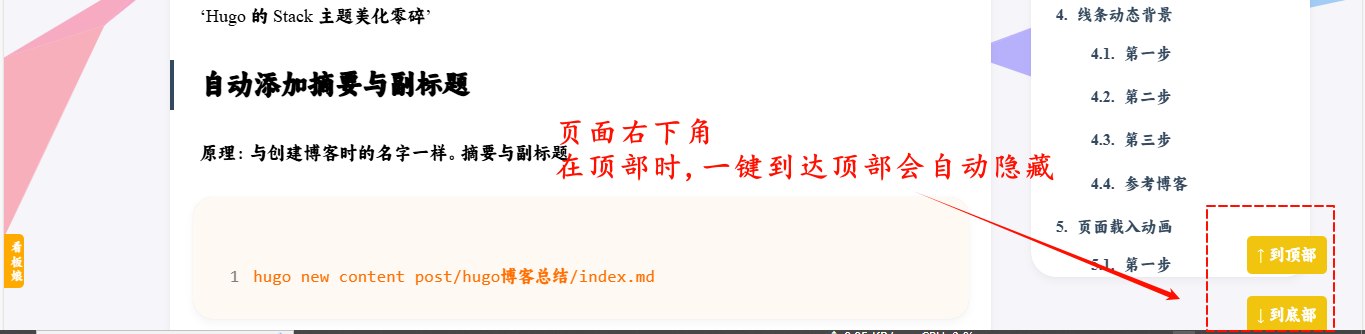
一键直达顶部与底部
参考的ChatGPT
示例图片
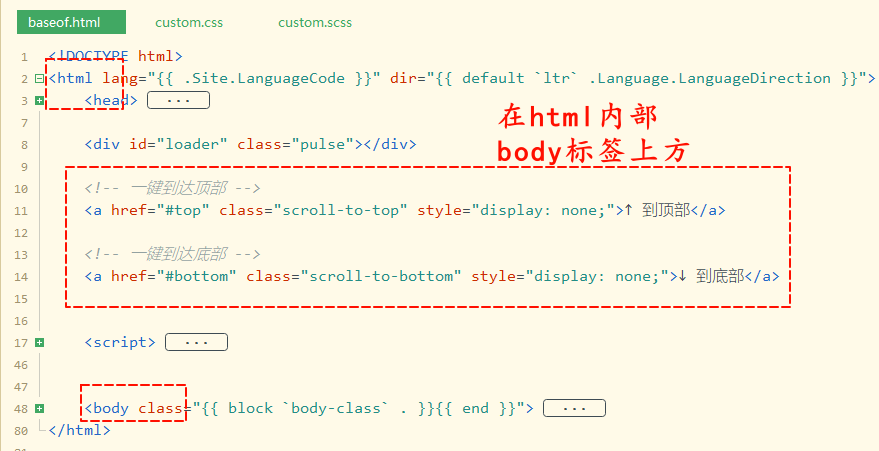
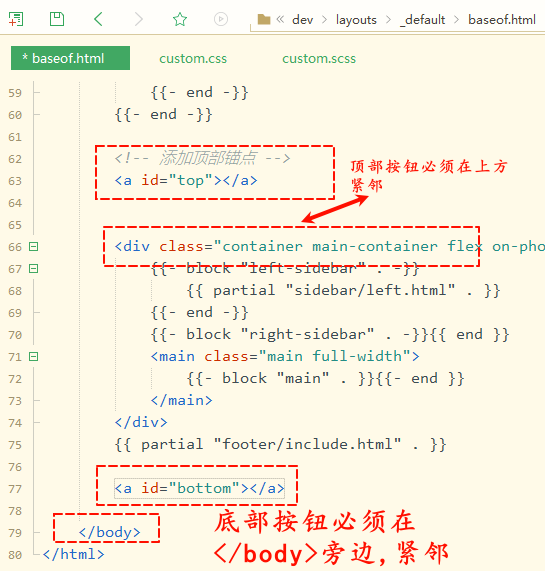
第一步: 创建按钮
位置: layouts/_default/baseof.html
baseof.html插入的位置很重要,不然显示不出来
1
2
3
4
5
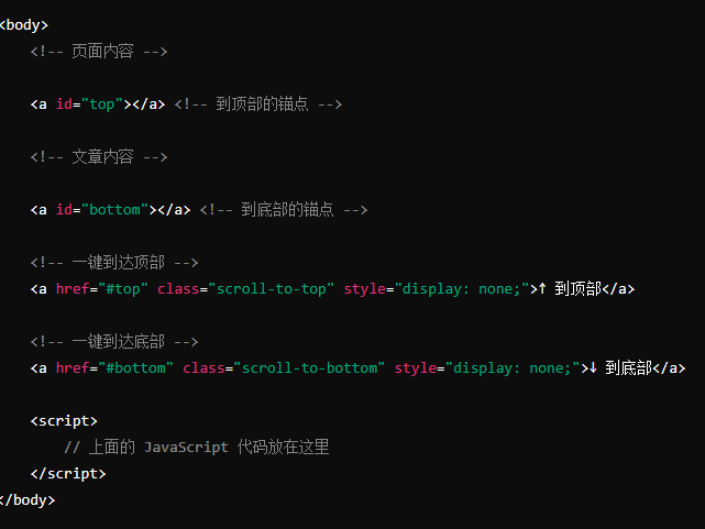
<!-- 一键到达顶部 -->
< a href = "#top" class = "scroll-to-top" style = "display: none;" > ↑ 到顶部</ a >
<!-- 一键到达底部 -->
< a href = "#bottom" class = "scroll-to-bottom" style = "display: none;" > ↓ 到底部</ a >
正常显示要求
第二步: 添加 CSS
位置:/dev/assets/scss/custom.scss
建议在最底部
 1
 2
 3
 4
 5
 6
 7
 8
 9
10
11
12
13
14
15
16
17
18
19
20
21
22
.scroll-to-top ,
.scroll-to-bottom {
position : fixed ;
bottom : 20 px ;
right : 20 px ;
background-color : #f1c40f ; /* 按钮背景色 */
color : white ; /* 字体颜色 */
border : none ;
border-radius : 5 px ;
padding : 10 px ;
cursor : pointer ;
z-index : 1000 ; /* 确保按钮在最上层 */
}
.scroll-to-top {
bottom : 80 px ; /* 到顶部按钮的位置 */
}
.scroll-to-top :hover ,
.scroll-to-bottom :hover {
background-color : #e67e22 ; /* 悬停时的背景色 */
}
位置:dev/assets/scss/style.scss只负责 引入 custom.scss的内容,具体内容还是在custom.scss内填写
不加的话,只有文字,且不会跳转
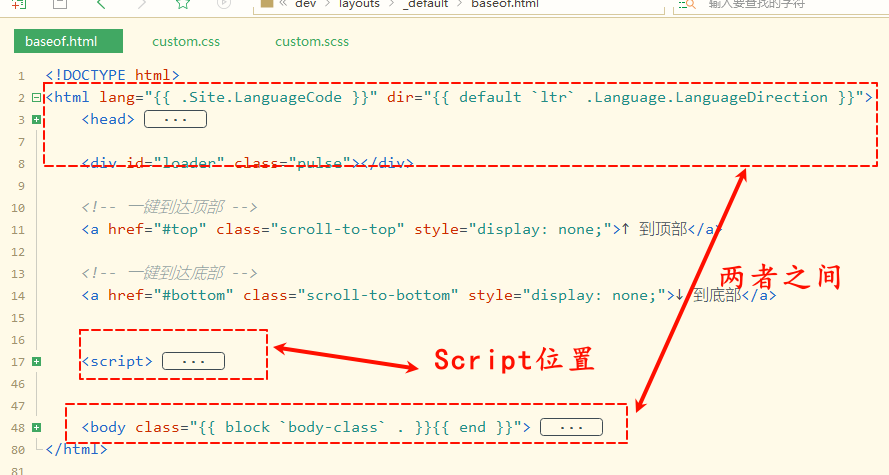
第三步: 添加 JavaScript
位置: layouts/_default/baseof.html
文件内位置有要求
 1
 2
 3
 4
 5
 6
 7
 8
 9
10
11
12
13
14
15
16
17
18
19
20
21
22
23
24
25
26
27
28
29
< script >
// 页面滚动事件
window . onscroll = function () {
var scrollTopBtn = document . querySelector ( '.scroll-to-top' );
var scrollBottomBtn = document . querySelector ( '.scroll-to-bottom' );
if ( document . body . scrollTop > 20 || document . documentElement . scrollTop > 20 ) {
scrollTopBtn . style . display = "block" ; // 显示到顶部按钮
} else {
scrollTopBtn . style . display = "none" ; // 隐藏到顶部按钮
}
if (( window . innerHeight + window . scrollY ) >= document . body . offsetHeight ) {
scrollBottomBtn . style . display = "none" ; // 隐藏到底部按钮
} else {
scrollBottomBtn . style . display = "block" ; // 显示到底部按钮
}
};
// 滚动到顶部
document . querySelector ( '.scroll-to-top' ). onclick = function () {
window . scrollTo ({ top : 0 , behavior : 'smooth' });
};
// 滚动到底部
document . querySelector ( '.scroll-to-bottom' ). onclick = function () {
window . scrollTo ({ top : document . body . scrollHeight , behavior : 'smooth' });
};
</ script >
使用简单的 JavaScript 来控制这些按钮的显示和隐藏,并实现滚动效果。
第四步: 确保锚点存在
位置: layouts/_default/baseof.html
文件内位置有要求
1
2
3
4
5
6
7
<!-- 添加顶部锚点 -->
< a id = "top" ></ a >
<!-- 其他内容 -->
<!-- 添加底部锚点 -->
< a id = "bottom" ></ a >
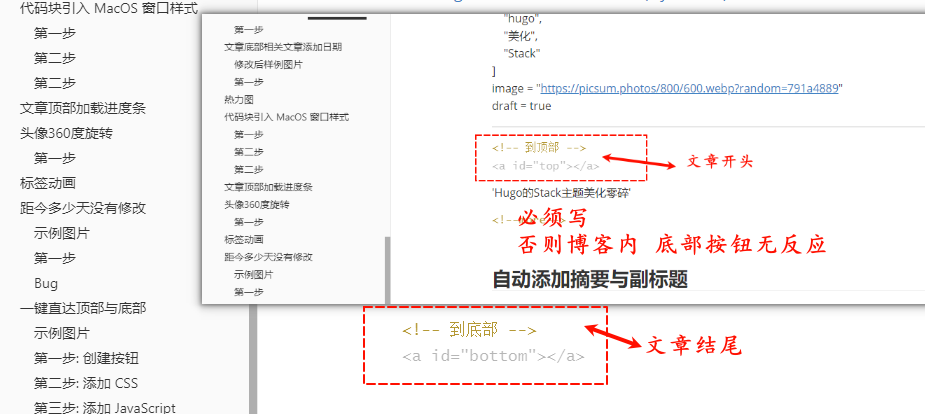
博客内部
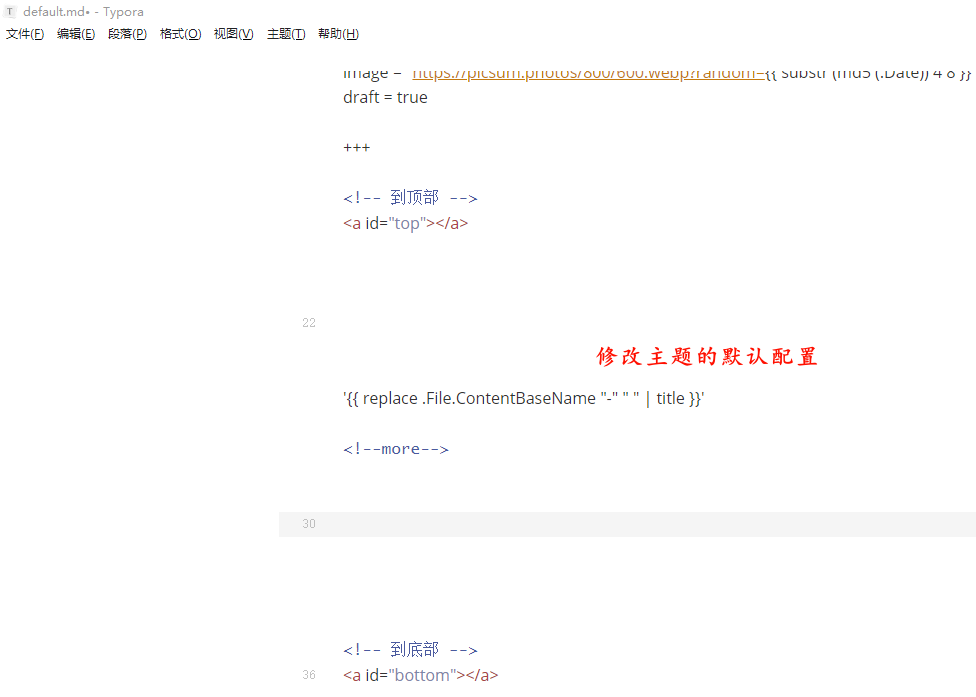
第五步 修改博客默认配置
位置:dev\archetypes\default.md
1
2
3
4
5
6
7
<!-- 到顶部 -->
< a id = "top" ></ a >
博客内容
<!-- 到底部 -->
< a id = "bottom" ></ a >
配置好后,一键到达底部才能用(博客内的文章)
只要基础模版有就行
位置:
总结
确保你的 HTML 结构大致如下:
有Bug
只有主页能显示 顶部 与 底部刷新后 第一次点击 底部按钮 会变成 到达顶部,一下跳转到顶部 第二次才会到达底部
修改布局
在 /assets/scss/grid.scss 中修改 left-sidebar 和 right-sidebar 的描述:
 1
 2
 3
 4
 5
 6
 7
 8
 9
10
11
12
13
14
15
16
.left-sidebar {
order : - 3 ;
// max-width: var(--left-sidebar-max-width);
max-width : 10 % ;
}
.right-sidebar {
order : - 1 ;
// max-width: var(--right-sidebar-max-width);
max-width : 20 % ;
/// Display right sidebar when min-width: lg
@include respond ( lg ) {
display : flex ;
}
}
参考博客
Hugo-theme-Stack 魔改美化 | Naive Koala (xalaok.top)
首页横幅
参考图片
第一步
在 /layouts/index.html 的 <section class="article-list"> 前添加以下代码:
 1
 2
 3
 4
 5
 6
 7
 8
 9
10
11
<!-- 首页欢迎字幅 -->
< div class = "welcome" >
< p style = "font-size: 2rem; text-align: center; font-weight: bold" >
< span class = "shake" > 👋</ span >
< span class = "jump-text1" > Welcome</ span >
< span class = "jump-text2" > To </ span >
< span class = "jump-text3" style = "color:#e99312" > Xa</ span >< span class = "jump-text4" style = "color:#e99312" > l</ span >< span class = "jump-text5" style = "color:#e99312" > a</ span >< span class = "jump-text6" style = "color:#e99312" > o</ span >< span class = "jump-text7" style = "color:#e99312" > k</ span >< span class = "jump-text8" style = "color:#e99312" > 's</ span >
< span class = "jump-text9" style = "color:#e99312" > Blog</ span >
</ p >
</ div >
<!-- 首页欢迎字幅 -->
第二步
在 /assets/scss/custom.scss 中加入以下代码:
  1
  2
  3
  4
  5
  6
  7
  8
  9
 10
 11
 12
 13
 14
 15
 16
 17
 18
 19
 20
 21
 22
 23
 24
 25
 26
 27
 28
 29
 30
 31
 32
 33
 34
 35
 36
 37
 38
 39
 40
 41
 42
 43
 44
 45
 46
 47
 48
 49
 50
 51
 52
 53
 54
 55
 56
 57
 58
 59
 60
 61
 62
 63
 64
 65
 66
 67
 68
 69
 70
 71
 72
 73
 74
 75
 76
 77
 78
 79
 80
 81
 82
 83
 84
 85
 86
 87
 88
 89
 90
 91
 92
 93
 94
 95
 96
 97
 98
 99
100
101
102
103
104
105
106
107
108
//首页欢迎板块样式
.welcome {
color : var ( -- card-text-color-main );
background : var ( -- card-background );
box-shadow : var ( -- shadow-l2 );
border-radius : 30 px ;
display : inline-block ;
}
// 👋emoji实现摆动效果
.shake {
display : inline-block ;
animation : shake 1 s ;
animation-duration : 1 s ;
animation-timing-function : ease ;
animation-delay : 0 s ;
animation-iteration-count : 1 ;
animation-direction : normal ;
animation-fill-mode : none ;
animation-play-state : running ;
animation-name : shake ;
animation-timeline : auto ;
animation-range-start : normal ;
animation-range-end : normal ;
animation-delay : 2 s ;
@keyframes shake {
0 % {
transform : rotate ( 0 );
}
25 % {
transform : rotate ( 45 deg ) scale ( 1 .2 );
}
50 % {
transform : rotate ( 0 ) scale ( 1 .2 );
}
75 % {
transform : rotate ( 45 deg ) scale ( 1 .2 );
}
100 % {
transform : rotate ( 0 );
}
}
}
// 实现字符跳动动画
.jump-text1 {
display : inline-block ;
animation : jump 0 .5 s 1 ;
}
.jump-text2 {
display : inline-block ;
animation : jump 0 .5 s 1 ;
animation-delay : 0 .1 s ;
}
.jump-text3 {
display : inline-block ;
animation : jump 0 .5 s 1 ;
animation-delay : 0 .2 s ;
}
.jump-text4 {
display : inline-block ;
animation : jump 0 .5 s 1 ;
animation-delay : 0 .3 s ;
}
.jump-text5 {
display : inline-block ;
animation : jump 0 .5 s 1 ;
animation-delay : 0 .4 s ;
}
.jump-text6 {
display : inline-block ;
animation : jump 0 .5 s 1 ;
animation-delay : 0 .5 s ;
}
.jump-text7 {
display : inline-block ;
animation : jump 0 .5 s 1 ;
animation-delay : 0 .6 s ;
}
.jump-text8 {
display : inline-block ;
animation : jump 0 .5 s 1 ;
animation-delay : 0 .7 s ;
}
.jump-text9 {
display : inline-block ;
animation : jump 0 .5 s 1 ;
animation-delay : 0 .9 s ;
}
@keyframes jump {
0 % {
transform : translateY ( 0 );
}
50 % {
transform : translateY ( - 20 px );
}
100 % {
transform : translateY ( 0 );
}
}
总结
首页的页面是 /layouts/index.html
涉及到两个文件的修改,一个首页,一个css样式
遇到的一个小Bug,动图本地正常显示,生成网页博客时无法显示
原因: 动图的名称里面有空格
修改完成后,需要重新启动博客
涉及到的文件
/layouts/index.html/assets/scss/custom.scss
键盘样式图标
CTRL + C
1
< kbd > CTRL</ kbd > + < kbd > C</ kbd >
在 /assets/scss/custom.scss 中加入以下代码:
 1
 2
 3
 4
 5
 6
 7
 8
 9
10
11
12
13
14
// 键盘样式
kbd {
margin : 0 .1 em ;
padding : .1 em .6 em ;
font-size : .8 em ;
color : #242729 ;
background : #fff ;
border : 1 px solid #adb3b9 ;
border-radius : 3 px ;
box-shadow : 0 px 1 px 0 rgba ( 12 , 13 , 14 , 0 .2 ) , 0 0 0 2 px #fff inset ;
white-space : nowrap ;
vertical-align : middle ;
font-family : monospace ;
}
全局美化参考博客
hugo+stack+waline博客网站一体化构建美化 (wintery.social)
动态背景
示例图片
代码
位置:dev/layouts/index.html
1
2
3
4
5
<!-- 动态背景 -->
<!-- 桃花飘落 -->
< script type = "text/javascript" src = "https://cdn.jsdelivr.net/gh/Ukenn2112/UkennWeb@3.0/index/web.js" ></ script >
<!-- 动态线条 -->
< script src = "https://cdnjs.cloudflare.com/ajax/libs/canvas-nest.js/2.0.4/canvas-nest.js" ></ script >
参考博客
【Web】博客、个人网站背景美化的几个方法(sakura / canvas-nest / particles)_web添加背景美化效果-CSDN博客
动态加载页面
让等待成为一种享受
https://www.fly63.com/tool/loading
实现载入动画 如何让载入动画覆盖整个页面? 实现标签对页面的全覆盖 页面掩盖 —— 博客园 载入动画设置 - neumy - 博客园 (cnblogs.com)
肝了两宿才收集的17个超炫酷的 CSS 动画加载与进度条特效,绝对值得收藏!!!_经典css特效-CSDN博客
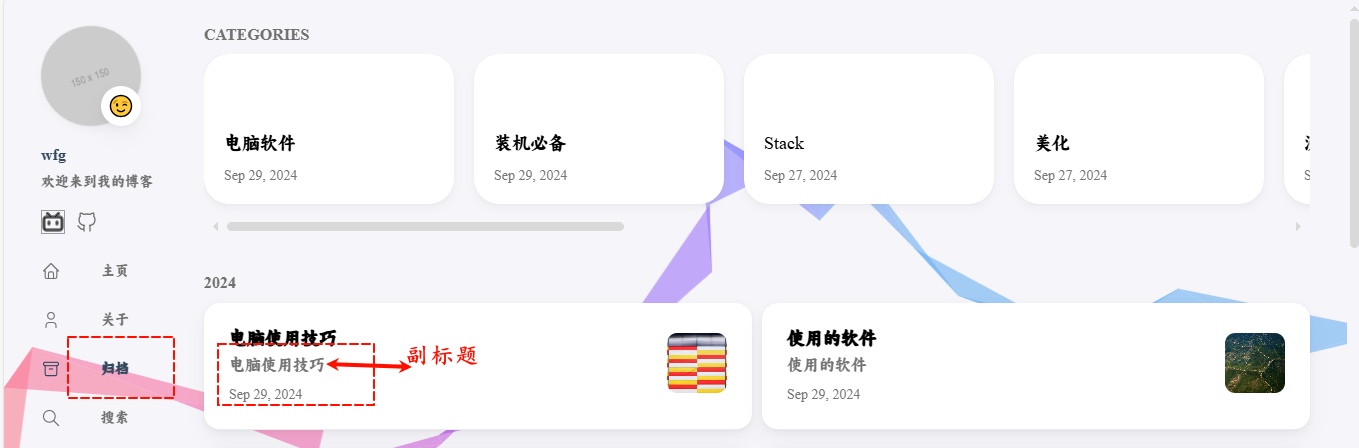
归档页面展示副标题与简介
示例图片
第一步
在网站根目录的assets/scss/partials/新建article.scss
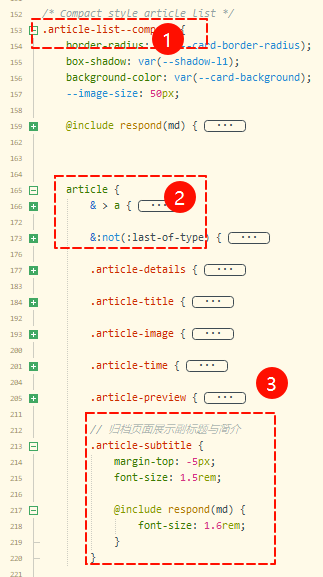
并将主题同目录下的同名文件内的内容全部复制粘贴进此文件夹,找到.article-list--compact,在里面添加如下内容:
1
2
3
4
5
6
7
8
.article-subtitle {
margin-top : - 5 px ;
font-size : 1 .5 rem ;
@include respond ( md ) {
font-size : 1 .6 rem ;
}
}
第二步
再在layouts/partials/article-list/中新建compact.html 填入如下内容:
 1
 2
 3
 4
 5
 6
 7
 8
 9
10
11
12
13
14
15
16
17
18
19
20
21
22
23
24
25
26
27
28
29
30
31
32
33
34
35
36
37
38
39
40
41
42
43
44
45
< article >
< a href = "{{ .RelPermalink }}" >
< div class = "article-details" >
< h2 class = "article-title" >
{{- .Title -}}
</ h2 >
{{ with .Params.description }}
< div class = "article-subtitle" >
{{ . }}
</ div >
{{ end }}
< footer class = "article-time" >
< time datetime = '{{ .Date.Format "2006-01-02T15:04:05Z07:00" }}' >
{{- .Date.Format (or .Site.Params.dateFormat.published "Jan 02, 2006") -}}
</ time >
</ footer >
</ div >
{{- $image := partialCached "helper/image" (dict "Context" . "Type" "articleList") .RelPermalink "articleList" -}}
{{ if $image.exists }}
< div class = "article-image" >
{{ if $image.resource }}
{{- $Permalink := $image.resource.RelPermalink -}}
{{- $Width := $image.resource.Width -}}
{{- $Height := $image.resource.Height -}}
{{- if (default true .Page.Site.Params.imageProcessing.cover.enabled) -}}
{{- $thumbnail := $image.resource.Fill "120x120" -}}
{{- $Permalink = $thumbnail.RelPermalink -}}
{{- $Width = $thumbnail.Width -}}
{{- $Height = $thumbnail.Height -}}
{{- end -}}
< img src = "{{ $Permalink }}"
width = "{{ $Width }}"
height = "{{ $Height }}"
alt = "{{ .Title }}"
loading = "lazy" >
{{ else }}
< img src = "{{ $image.permalink }}" loading = "lazy" alt = "Featured image of post {{ .Title }}" />
{{ end }}
</ div >
{{ end }}
</ a >
</ article >
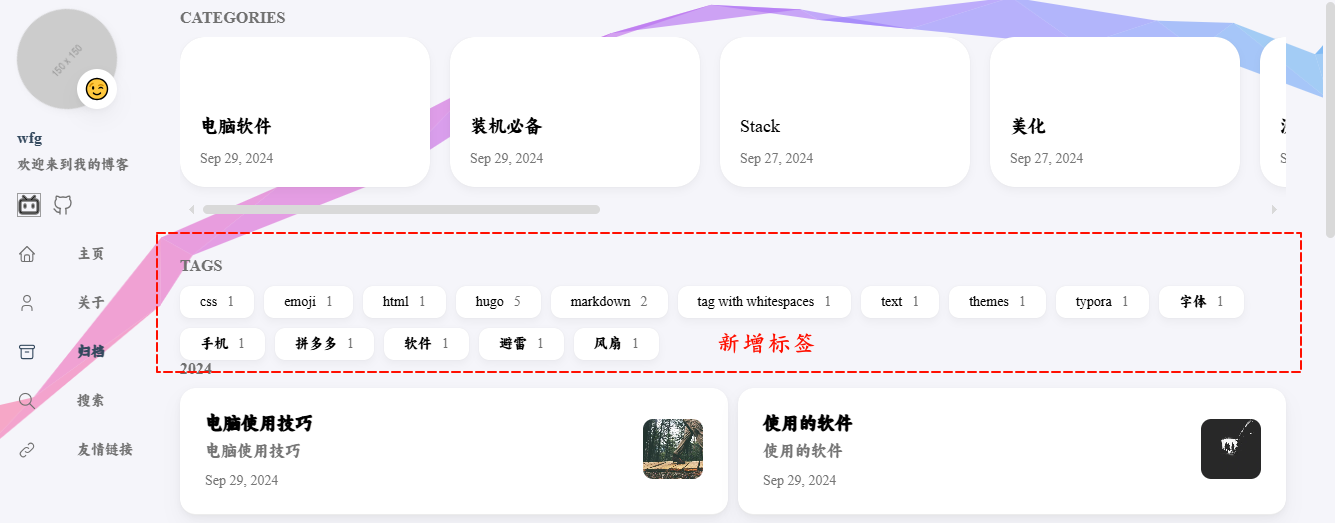
在归档页增加标签
示例图片
第一步
在网站根目录layouts/_default/内新建archives.html
 1
 2
 3
 4
 5
 6
 7
 8
 9
10
11
12
13
14
15
16
17
18
19
20
21
22
23
24
25
26
27
28
29
30
31
32
33
34
35
36
37
38
39
40
41
42
43
44
45
46
47
48
49
50
51
52
53
54
{{ define "body-class" }}template-archives{{ end }}
{{ define "main" }}
< header >
{{- $taxonomy := $.Site.GetPage "taxonomyTerm" "categories" -}}
{{- $terms := $taxonomy.Pages -}}
{{ if $terms }}
< h2 class = "section-title" > {{ $taxonomy.Title }}</ h2 >
< div class = "subsection-list" >
< div class = "article-list--tile" >
{{ range $terms }}
{{ partial "article-list/tile" (dict "context" . "size" "250x150" "Type" "taxonomy") }}
{{ end }}
</ div >
</ div >
{{ end }}
</ header >
{{- $taxonomy := $.Site.GetPage "taxonomyTerm" "tags" -}}
{{- $terms := $taxonomy.Pages -}}
{{ if $terms }}
< section class = "widget tagCloud" >
< h2 class = "section-title" > {{ $taxonomy.Title }}</ h2 >
< div class = "tagCloud-tags" >
{{ if ne (len $.Site.Taxonomies.tags) 0 }}
{{ range $name, $taxonomy := $.Site.Taxonomies.tags }}
{{ $tagCount := len $taxonomy.Pages }}
< a href = "{{ " / tags /" | relURL }}{{ $ name | urlize }}" class = "tagCloud-tags" >
{{ $name }}< span class = "tagCloud-count" > {{ $tagCount }}</ span >
</ a >
{{ end }}
{{ end }}
</ div >
< section >
{{ end }}
{{ $pages := where .Site.RegularPages "Type" "in" .Site.Params.mainSections }}
{{ $notHidden := where .Site.RegularPages "Params.hidden" "!=" true }}
{{ $filtered := ($pages | intersect $notHidden) }}
{{ range $filtered.GroupByDate "2006" }}
{{ $id := lower (replace .Key " " "-") }}
< div class = "archives-group" id = "{{ $id }}" >
< h2 class = "archives-date section-title" >< a href = "{{ $.RelPermalink }}#{{ $id }}" > {{ .Key }}</ a ></ h2 >
< div class = "article-list--compact" >
{{ range .Pages }}
{{ partial "article-list/compact" . }}
{{ end }}
</ div >
</ div >
{{ end }}
{{ partialCached "footer/footer" . }}
{{ end }}
第二步
在网站根目录assets/scss/partials/ 内新建widgets.scss
 1
 2
 3
 4
 5
 6
 7
 8
 9
10
11
12
13
14
15
16
17
18
19
20
21
22
23
24
25
26
27
28
29
30
31
32
33
34
35
36
37
38
39
40
41
42
43
44
45
46
47
48
49
50
51
52
53
54
55
56
57
58
59
60
61
62
63
64
65
66
67
68
69
70
71
72
73
.widget {
display : flex ;
flex-direction : column ;
.widget-icon {
svg {
width : 32 px ;
height : 32 px ;
stroke-width : 1 .6 ;
color : var ( -- body-text-color );
}
}
}
/* Tag cloud widget */
.tagCloud {
.tagCloud-tags {
display : flex ;
flex-wrap : wrap ;
gap : 10 px ;
a {
background : var ( -- card-background );
box-shadow : var ( -- shadow-l1 );
border-radius : var ( -- tag-border-radius );
padding : 8 px 20 px ;
color : var ( -- card-text-color-main );
font-size : 1 .4 rem ;
transition : box-shadow 0 .3 s ease ;
& :hover {
box-shadow : var ( -- shadow-l2 );
}
}
}
}
/* Archives widget */
.widget.archives {
.widget-archive--list {
border-radius : var ( -- card-border-radius );
box-shadow : var ( -- shadow-l1 );
background-color : var ( -- card-background );
}
.archives-year {
& :not ( :last-of-type ) {
border-bottom : 1 .5 px solid var ( -- card-separator-color );
}
a {
font-size : 1 .4 rem ;
padding : 18 px 25 px ;
display : flex ;
span .year {
flex : 1 ;
color : var ( -- card-text-color-main );
font-weight : bold ;
}
span .count {
color : var ( -- card-text-color-tertiary );
}
}
}
}
.tagCloud {
.tagCloud-count {
color : var ( -- body-text-color );
}
}
外部链接图片
示例图片
第一步
在网站根目录layouts/_default/_markup/新建render-link.html,并填入
 1
 2
 3
 4
 5
 6
 7
 8
 9
10
11
< a class = "link" href = "{{ .Destination | safeURL }}" {{ with . Title }} title = "{{ . }}"
{{ end }}{{ if strings . HasPrefix . Destination " http " }} target = "_blank" rel = "noopener"
{{ end }} > {{ .Text | safeHTML }}</ a >
{{ if strings.HasPrefix .Destination "http" }}
< span style = "white-space: nowrap;" >< svg width = ".7em"
height = ".7em" viewBox = "0 0 21 21" xmlns = "http://www.w3.org/2000/svg" >
< path d = "m13 3l3.293 3.293l-7 7l1.414 1.414l7-7L21 11V3z" fill = "currentColor" />
< path d = "M19 19H5V5h7l-2-2H5c-1.103 0-2 .897-2 2v14c0 1.103.897 2 2 2h14c1.103 0 2-.897 2-2v-5l-2-2v7z"
fill = "currentColor" >
</ svg ></ span >
{{ end }}
使用Hugo部署博客以及Stack主题的美化 - Summer (vofficial233.com)
鼠标单击特效
示例图片
第一步
在static/js里,将下载的文件添加进去anime.min.js和fireworks.js
第二步
位置: dev/layouts/partials/footer/custom.html
 1
 2
 3
 4
 5
 6
 7
 8
 9
10
11
12
13
14
15
16
17
<!-- 鼠标单击特效烟花 Bug 添加后无法点击文章-->
< style type = "text/css" >
. fireworks {
position : fixed ;
top : 0 ;
left : 0 ;
widows : 100 % ;
height : 100 % ;
}
</ style >
< canvas class = "fireworks" ></ canvas >
< script src = "js/anime.min.js" ></ script >
< script src = "js/fireworks.js" ></ script >
< script type = "text/javascript" >
fireworks . setCanvasSize ();
</ script >
<!-- 鼠标单击特效烟花结束 -->
Bug
引入后,只会出现烟花特调,点击文章界面没有反应
参考博客
【hugo】- hugo 博客 添加鼠标单击特效 - somliy - 博客园 (cnblogs.com)
添加站点统计信息 i18
https://blog.mulinbiao.com/post/stack-beautify/
Hugo模板功能及加载顺序说明 - 背字根 (beizigen.com)
博客访问次数
Hugo网站引入访问计数插件不蒜子(busuanzi) (zyh-ovo.github.io)
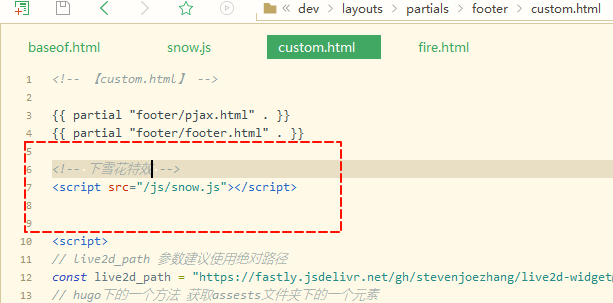
下雪花特效
示例图片
第一步
在static/js里新建一个snow.js,复制以下内容:
 1
 2
 3
 4
 5
 6
 7
 8
 9
10
11
12
13
14
15
16
17
18
19
20
21
22
23
24
25
26
27
28
29
30
31
32
33
34
35
36
37
38
39
40
41
42
43
44
45
46
47
48
49
50
51
52
53
54
55
56
57
58
59
60
;( function () {
const Config = {
snow : [ '❄' , '' , '※' , '⛄' , '☃' , '🎄' , ], // 雪花的样式,可以放不同的雪花,或者任何 emoji,每次生成新雪花时会随机挑选其中一个
color : '#d9e2e7' , // 雪的颜色
speed : 10 , // 雪花从生成到落到最底端所经历的时间,单位是秒。数字越小落得越快
dom : document . getElementsByTagName ( 'body' )[ 0 ], // 下雪的区域,可以保持不变,这样就是全屏下雪
interval : 800 // 生成一片雪花的时间间隔,单位是毫秒
}
if ( ! Config . dom ) {
throw Error ( '错误提示' )
}
const $canvas = document . createElement ( 'div' )
useStyle ( $canvas , {
width : '100%' ,
height : '100%' ,
position : 'fixed' ,
top : 0 ,
left : 0 ,
pointerEvents : 'none' ,
zIndex : 100
})
setInterval (() => {
const $snow = document . createElement ( 'div' )
$snow . innerText = Config . snow [ rand ( 0 , Config . snow . length - 1 )]
useStyle ( $snow , {
display : 'inline-block' ,
color : Config . color ,
fontSize : rand ( 14 , 25 ) + 'px' ,
position : 'absolute' ,
top : 0 ,
left : rand ( 0 , 100 ) + '%' ,
transition : 'transform ' + Config . speed + 's linear' + ',opacity ' + Config . speed + 's linear' ,
transform : 'translateY(-100%)' ,
opacity : Math . random () + 0.3
})
setTimeout (() => {
useStyle ( $snow , {
transform : 'translate(0, ' + getComputedStyle ( $canvas ). height + ') rotate(480deg)' ,
opacity : 0
})
$snow . addEventListener ( 'transitionend' , () => {
$snow . remove ()
})
}, 100 )
$canvas . appendChild ( $snow )
}, Config . interval )
function rand ( from , to ) {
return from + Math . floor ( Math . random () * ( to - from + 1 ))
}
function useStyle ( dom , style ) {
for ( let sKey in style ) {
dom . style [ sKey ] = style [ sKey ]
}
}
Config . dom . appendChild ( $canvas )
})()
第二步
之后在/layouts/partials/footer/custom.html中加入
1
< script src = "/js/snow.js" ></ script >
Bug
只有主页显示,博客内不显示,
其他的 桃花飘落,动态线条也是
而 彩虹背景不会
文章里面也能显示雪花了 2024年9月29日20:40:51
只有一篇博客里面显示,其余的都不显示雪花 2024年9月29日20:42:34
重启服务器,又刷新之后,里可以了,所有博客都可以显示雪花了,2024年9月29日20:51:08
但 桃花飘落没显示
2024年9月30日13:40:48 把看板娘删除后,线条,雪花,桃花 又能在 博客文章内显示了
参考博客
嗖得一下11月 - Mengru的空间
参考博客
Hugo Theme Stack 美化教程 (lsy22.com)
Hugo Stack主题更新小记 (xrg.fj.cn)
免费图标SVG,PNG,ICO或ICNS (icon-icons.com)
CSS 变量 | Hugo 主题 Stack (stack-docs.netlify.app)
Hugo | 在 Stack 主题上可行的短代码们 (sleepymoon.cyou)
归档 - Tom’s Blog (grew.cc)
个人感想
ChatGPT永远的神,用Kimi快给我气死了,人工智障,永远回答假大空,一直做不对,ChatGPT立马给我答案
hugo的stack主题 目录只有三级显示
ChatGPT真优秀,会给出文档结构,要修改的,一目了然
开始的+++号必须在第一行,才能显示这一片博客